Lab 3a: Movie Clips - Field of Flowers

NOTE: This lab is the property of Trish Cornez

Exercise 1


Part I Creating A Field of Animated Flowers!


In this lab you will create a movie clip symbol and duplicate it on the stage in Scene 1. To build this animation, you will draw and store graphic symbols in the Library, use the timeline to create different layers and motion tweens.

This assignment covers:
  • Drawing graphic images and storing them as symbols in the Library
  • Creating Motion Clips
  • Placing symbols from the Library on the Stage.
  • Working with the Timeline and adding Layers
  • Inserting Keyframes and applying Motion Tweens
Step 1: Getting Started.
  1. Load Flash.
  2. Take a moment to examine the screen. Notice that the stage is called Scene 1 and that the Timeline contains exactly one layer.
Step 2: In this step, you will draw a graphic image of a Flower and store it as a symbol in the Library.
  1. Open the Library Palette by choosing Library from the Window menu.
  2. Click the New Symbol (it looks like a plus sign) in the lower left corner of the Library Palette.
  3. From the New Symbol Dialog box, enter Flower for the name and choose Graphic. Click OK when done.
    Examine the TimeLine and the Stage. You should notice that you are no longer working in Scene 1, but instead you have activated the Flower canvas.
  4. Draw a flower without a stem. Begin with a single petal. Use the color mixer to apply an interesting gradient. Make a copy and use the transform tool to flip and rotate each flower petal.
  5. Return to the main stage by clicking Scene1 just below the Timeline window. Notice that the stage is empty.
Save your document after completing this step.
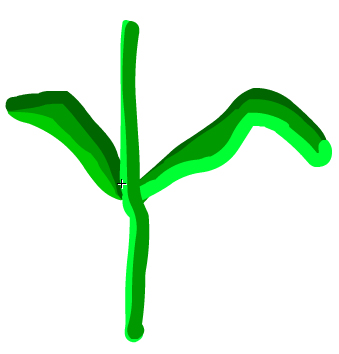
Step 3: In this step, you will draw the Stem of the flower and store it as a Symbol in the Library.
  1. Click the New Symbol in the lower left corner of the Library Palette.
  2. From the New Symbol Dialog Box, enter Stem for the name and choose Graphic. Click OK when done.
    Examine the TimeLine and the Stage. You should notice that you are working on the Stem canvas.
  3. Select the Brush Tool from the Tool Palette and choose a greenish color of your choice for the fill. Also choose a brush size. Draw the flower stem shown on the right.
    NOTE: you may need to change the color and the brush size for more interesting effects.
  4. Return to Scene 1 when you have completed the Stem drawing.
At this point you should have two symbols in your library ñ the Flower and the Stem.
Save your document after completing this step.


Step 4: You are now ready to create a Movie Clip Symbol containing the flower graphic and the stem graphic symbols.
  1. Verify that you are inScene 1.
  2. Click the New Symbol in the lower left corner of the Library Palette. < li> From the New Symbol Dialog Box, enter Animated Flower for the name and choose Movie Clip. Click OK when done.
  3. You will need two layers in the timeline for the animated Flower. To add a second layer, click the Plus symbol in the lower left corner of the TimeLine Palette.
  4. Rename Layer 1 Stem Layer by double-clicking the text and entering the new text. Rename Layer 2 Flower Layer.
  5. Activate Frame 1 in the Stem Layer. Use your mouse to drag the Stem symbol from the Library onto the stage.
    Activate frame 60 in the Stem Layer and press the F5 key on your keyboard. This will extend the Stem graphic from frame 1 through frame 60.
  6. Place the Flower Symbol in Frame 1 of the Flower Layer.
    Use the Arrow Tool to position it at the top of the stem.
    It is very important that the flower and the stem occupy separate layers.
  7. Now for the animation. Select Frame 30 of the Flower Layer.
    From the Insert Menu, choose keyframe to extend the flower to frame 30.
    With frame 30 still selected, choose the Free Transform Tool and rotate and shrink the flower.
    To finish the animation, activate cell 29 of the Flower Layer and choose Motion from the Tween option in the Properties palette.
  8. To make the flower rotate back again, click frame 60 of the Flower Layer and Insert a keyframe (Do NOT insert a Blank Keyframe!).
    With frame 60 still selected, choose the Free Transform Tool and rotate the flower back to its original position and expand the flower again.
    Activate frame 59 of the Flower Layer and create another Motion tween.
  9. Return back to Scene 1 when you are done.
At this point you should have three symbols in your Library ñ Animated Flower, Flower, and Stem.
Save your document after completing this step.

Step 5: Now it's time to place multiple animated flowers in a variety of sizes on the main stage (Scene 1).
  1. Verify that you are back in Scene 1. Remember that Scene 1 is the main stage of your animated logo.
  2. Activate frame 1 of Layer 1.
  3. Drag the Animated Flower (Movie Clip) from the Library onto the stage.
  4. Use the Free Transform Tool to size it the way you want.
  5. Continue dragging Animated Flowers from the Library onto the stage until you have about eleven animated flowers on stage located in Layer 1 of frame 1.
  6. Resize each of these flowers so they each look a little different.
Save your document after completing this step.

Step 6: Test the Movie!


Step 7: Publish your final Logo for the Web.
  1. Choose Publish Settings from the File menu. Select .swf (the shockwave file) and HTML.
    Click Publish when done. Flash has now created the following two files: the animated file and the html file to be viewed in your browser.
  2. You may exit Flash at this point.
  3. Load your Internet browser (Explorer, Safari, Netscape, etc.) and open the HTML flower file.

Exercise 2

Modify exercise 3a to look like the animation below.

Exercise 3

On your own, construct the following animation.


Exercise 4

On your own, construct the following animation using frame-by-frame movieclips.